Replacement clothes bar
(Note to the Dissertationally-concerned: I only worked on the following project during evenings. Maybe four person-hours invested, across three evenings. And this thing needed to be fixed, anyhow; household tasks don't stop for Dissertations.) ;)
Because we live in an older house (circa 1930s), there are very few built-in cupboards or closets: two in the bathroom, plus the pantry in the kitchen. That's it.
So, The Lady and I (and The Kid) each keep our clothes in free-standing wardrobes. The wardrobes were designed for an earlier time, when people had one good suit (or dress), and maybe a coat or two or one or two pairs of trousers: everything else got folded and put in drawers.
 But because we live in modern times, with inexpensive mass-produced clothing (and are arguably more consumeristic, as well), we've massively overloaded the wardrobes' designed capacity. Thus, a few months ago, the small-diameter dowel [9mm; 3/8 inch] on The Lady's side broke under the weight.
I re-glued it, and re-installed it with the grain oriented vertically (maxmizes the strength). This lasted a month or two, but then it broke again.
What I needed was a replacement clothes rod that had a higher load-capacity than the original -- but which could be retro-fitted to the wardrobe without altering it (the wardrobe is on loan from The Lady's parents). And my upgrade had to be easily un-do-able, in case later owners of the wardrobe wanted to return it to its original state.
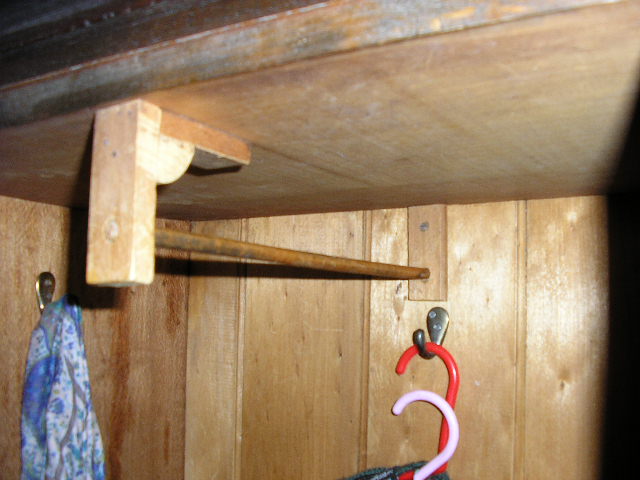
 My solution was to create a shallow U-shaped bar out of a one of my salvaged pieces of wood (i.e. from my hoarded stash o' wood). The vertical dimensions are plenty thick, so it's unlikely to break. To slot it in to the same mounting as the previous dowel, I pegged it in place with a short length of dowel that fits into the existing dowel holes. And to facilitate its later removal, the rear dowel is glued into the body, but the front one is just held by friction, and wedged/pinned into the front mounting; to remove, just remove the small pins.
The design element that I'm most pleased with: the load-bearing surface (i.e. where the clothes hangers slide across) is below the axis of the dowels. This means that this replacement bar won't ever flip over, because the clothes are pulling **down**, rather than sideways. Yet, it can still flex and pivot in the mountings (i.e. the bar can hang at an angle), if a smaller-diameter clothes hanger hook needs to be used.
And, thanks to the simple boiled linseed oil finish (two coats), its appearance is fairly in keeping with the rest of the wardrobe. (The dowel is an obvious retrofit, anyhow -- maybe by The Lady's granddad.)
(Tools used: tenon saw, coping saw, drawknife [!-first time used on a legitimate project!], power drill, spade bit, popsicle stick, sandpaper.)
--GG
posted by Gye Greene @ 9:08 PM
![]()
![]()


1 Comments:
Yeah! GALOOT!
Post a Comment
<< Home