Sideboard/workbench update
 Brought the ''sideboard- now, eventually- work- bench,'' into our back yard, under the Hill's hoist with the blue tarp over the center (did the tarp Sunday, Mar. 5th, I think).
As you can see, put it on some scrap roofing, to keep it off the wet grass; may prop it up further, in a bit.
 In moving it from the humpie to our back yard -- by myself! -- I was reminded of how non-stable it is; hard to carry, due to its rickity-ness. I had forgotten how non-connected some of the pieces are, plus it's not at all lightweight -- and it was hard to find a good way to carry it for more than a step or two.
Also rescued various pieces of wood, including some pieces that were probably the backs of the cupboard, due their length plus having remnants of the same barn-red paint. Also grabbed a big long plank -- heavy!!! -- 4cm thick, 30cm deep, about261cm long. For comparision, the top of the cabinet is 145cm x 44cm.
 As I said, the wood plank I rescued is 30cm x 260cm; top of body is 145cm x 44cm. In the photos, gloves and mallet shown for size reference.)
Some of the plank may be lost to charring, but should be able to plane it off and still retain most of its thickness. Doesn't appear to be any rot.
The size of the board would cover the top of the cabinet, but only if I do funny fiddling around with it. I'd be better off having it cover the front two-thirds, and having some other piece of wood covering the back two-thirds. Maybe two layers of 2" x 4" or 2" x 6". Handplane the front and back sections to the same thickness.
 Another photo, indicating the thickness of the board. My workboot, for scale reference.
As I think about it -- and do some quick calcuating -- the plank is 7800cm^2, and the top of the cabinet is 6380cm^2. So, I could indeed cut and paste to make it cover the top, and even have some overhang left over, for clamping purposes; perhaps leave some along the back, just in case I have a situation where I'd have access to the back and need to clamp it all the way around.
6cm seems like a reasonable overhang, which brings the needed dimensions to 157cm x 56cm, with 8792cm^2; if have the same overhang all the way around, algebra would shows me what the lip should be, but I don't remember the quadratic equation offhand, and can't be bothered to look it up. However, a quickie Excel spreadsheet shows that that the lip could be 3.5cm deep (about an inch and a half); and now that I look at a ruler again, 2.5cm (about an inch) would be deep enough to be secure for both C-style clamps and bar clamps.
 Here's an end view, showing some of the more charred sections. Some phrase about ''silk purses and sow's ears'' keeps floating through my mind. But, I'm a bit (??!!) of a scavenger; I hate to waste things; and converting this into a workbench seems like an interesting project.
Plus, there's some minor sentimental value to it, as it came from the humpie (apparently, the Aussie term for a cabin with a dirt floor). And I'll be primarily using ''found'' wood -- both from the collapsed humpie and from another stash here on the property.
 This is a close-up of the top-center section in the front. You can see how the vertical isn't attached to anything. Also, I'll need to make some vertical spacer to bear the load of the ''lid'' of the workbench.
 Another shot of the top- front- center, from a different angle. Glove for scale. You can also see the gappy bit in the back.
Most of the repair will just be nailing the top right corner back together with the right side; but I'll also need to reinforce the whole body with some diagonal braces across the corners, to prevent it from racking when using as a workbench, e.g. when plane-ing.
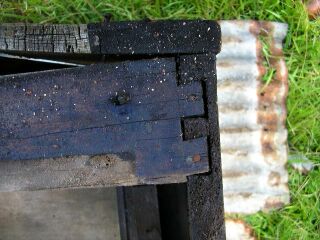 One redeeming character- istic is that whoever built this orginally seemed to have a pretty good design. This is a shot of the right rear corner, showing the blind finger joints (for those that know their woodworking joints). I think the darkness indicates charring, but it could be a stain of some sort, as well.
No apparent rot in any of the section, based on the ''rapping it with a hammer handle'' test (i.e. listening to the tone). Just some charred bits. if there was rot, I probably wouldn't bother. But all the wood seems solid -- just pulled loose at the various joints.
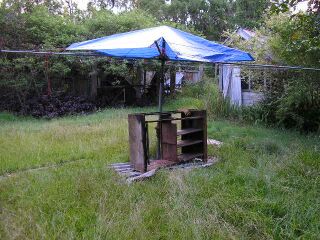 Here's a shot of what my eventual ''temporary workshop'' will look like. Have a tarp over the Hill's hoist (the clothesline); I've since added a pair of ropes, staked into the ground, to keep the Hill's hoist from rotating in the wind.
 From the side view, you can see that the [future] workbench is under shelter, such that if it rains it shouldn't get wet -- or at least, not too wet. I may add a larger tarp, or shift this tarp forwards.
Or, I may keep a stash of wood on the other side of the vertical pole. Or cover the whole area -- possibly add a series of overalapping tarps, if the smaller tarps are cheaper than one large tarp. Dunno yet.
Based on my working style, I'll probably have some sheetmetal shelves off to one side. I've discovered that I like having my tools and parts handy, at waist thru head level.
Yes, I know that rescuing old cabinets is not ''working on my Dissertation.'' However, this was time-dependent: I couldn't let it rot in the rain for four months, until I had time for it!
--GG
posted by Gye Greene @ 8:38 PM
![]()
![]()


0 Comments:
Post a Comment
<< Home