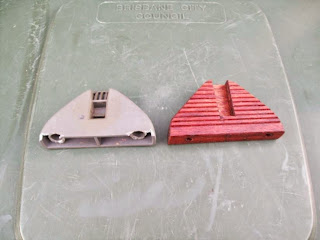
A total fabrication
About three weeks ago I was carrying a somewhat heavy load in the back of my Land Rover; the load shifted; and the bracket that holds the retractable "privacy screen" over the cargo bay broke off.
My experience with car parts -- especially the parts made of plastic -- is that they charge a lot more than what the part is worth (a molded piece of plastic??!!). I'm guessing that a replacement for this part would've cost me AU$50-$100. Not worth it.
But, I do like having the screen over the cargo bay.
So, I decided to fabricate a replacement. I got into woodworking in the first place for pragmatic reasons: custom-making shelves and such for my recording gear that fit very specific space requirements (basically, in my bedroom in a shared two bedroom apartment). So this is just a continuation of that.
In this first shot you can see the broken-out bottom of the original bracket. There's not supposed to be the large holes on the bottom: it's supposed to have just a small screw hole -- but that section was torn out.
The piece of wood is an offcut from my next door neighbor's deck, which they built about seven years ago.
Here's another shot, where you can see that the scrap of wood is a pretty good size: not too much waste.
And, the thickness is already pretty close to what I'll need.
Normally I'd show a few of the steps in the construction -- but this time, I couldn't be bothered.
The final product is the result of work spread across two weekends: a little per day, over three days.
Except for a using a power drill to drill the holes, I used only traditional woodworking hand tools: no electricity.
Basically:
-a marking gauge and a bevel guage for the layout, plus a homemade marking knife for the actual marking;
-two chisels (and a paternal grandfather wooden mallet) for the stopped dado, followed by a router plane to make the depth consistent;
-a backsaw (and a bench hook) for cutting off the excess;
-and a rasp and a file for the final shaping. Plus some sandpaper.
Front view. You can see how the holes in the bottom are supposed to look.
Top view. I used a router plane to make the depth of the stopped dado the same as the depth of the original item's slot.
Back view. I made a mistake partway through, and scribed lines on the back (Dangit!). But I decided that I'd invested enough time that it wasn't worth scrapping my progress and going back to the beginning. I did sand it back a little -- but I didn't want to reduce the thickness too much. The way I've left it is a good compromise.
Then I gave it a coat of Danish oil/tung oil -- which was my paternal grandfather's preferred woodworking finish.
I could've spent 40% more time, to make it 5% better -- but given its purpose (it's in the back of a car -- not in a living room), I didn't think the cost-to-benefit ratio was worth it. Plus, I have a fairly large backlog of partially-finished projects (and yardwork): I don't have time to muck around like that; I need to maximize my rate of completion.
A completed project is a good project. I have far too many projects that are nearly finished -- and are therefore un-useable.
If I truly felt strongly enough about it, I could come back to it, remove it from the car, and make it 5% better. But, I won't. :)
--GG
Labels: geeky, woodworking


0 Comments:
Post a Comment
<< Home